Monday, December 23, 2013

Ancho Chile Candied Pecans

Last year for the holidays, I made some semi-successful salty maple pecans for people. This year, I got a real recipe for candied pecans and replaced the disgusting cinnamon with ancho chile powder. Holy crap was that a stroke of genius. The smoky chile flavor paired perfectly with the flavor of the pecans. I used less sugar and more salt than most recipes and have been receiving nothing but compliments, specifically that they are the perfect level of sweetness.


Ancho Chile Candied Pecans
2 lb pecans
1/4 C egg whites
2 T water
1/2 C evaporated cane juice (or granulated sugar)
1/2 C coconut sugar (or dark brown sugar)
3 t ancho chile powder
2 t Kosher salt

Preheat oven to 350. Whip egg whites with water just until a little foamy. Toss pecans in egg wash, coating thoroughly. Whisk the rest of the ingredients together and toss with eggy pecans until well-combined. Pour onto parchment-lined cookie sheet and bake 15 minutes. Stir and bake another 15-20 minutes until the sugary stuff starts to crystallize. Immediately remove parchment paper to another surface to cool. Wait to bag pecans (if you're not shoveling them directly into your mouth) until they are completely cooled and dry.

Friday, November 22, 2013

Leftover Chicken... Tikka Masala

Chicken Tikka Masala
1 lb leftover chicken, cubed (I used b/s breasts that had been roasted with olive oil, salt and pepper)
1/2 C plain yogurt
1/2 t each of garlic powder, ground ginger, garam masala

1 T butter or ghee
6 cloves garlic, minced
2 fresh jalapeno peppers, seeded and minced
2 T fresh grated ginger
1 t ground cumin
1 t ground coriander
1/2 t smoked paprika
2 t garam masala
salt & pepper to taste
8 oz tomato puree
1/2 C heavy cream

Toss the chicken with the yogurt and spices and set aside.

Melt butter/ghee over medium heat. Suatee jalapeno and garlic for about 1 minute, then add the ginger (protip: frozen ginger grates super easily) and dried spices. Cook for 1-2 minutes then add the tomato sauce. Bring to a boil, then turn the heat to low and simmer for 15 minutes. Add the cream and simmer another 5 minutes, then add the chicken mixture and simmer for 5 more minutes. Serve with rice if you do that kind of thing, or make my adaptation of "Paleo naan," below (no, I'm not a Paleo weirdo... yet... and it's not really naan). Makes 2 very protein-filled servings or 3-4 regular servings.

Lower-Carb "Naan"
1/2 C almond flour
1/2 C Bob's Redmill GF AP Baking Flour (or similar)
2/3 C coconut milk
1/3 C water
1/2 t salt

Stir all ingredients together and pour by fourths onto a medium-heat nonstick griddle or cast iron skillet. Makes 4 small breads. It's good, but more like a dosa than naan.

Sorry for no pictures... it wasn't that pretty.

Wednesday, November 20, 2013

Whey Protein Powder Comparison NERD TIME

This, my nerd friends, is a cost comparison for several brands of whey protein powder. Basically, I've calculated the price per gram of protein in each one, based on the cheapest price I could easily find online. I've also included a ratio of net carbs to protein and some comments, if applicable. If you'd like me to evaluate a brand you don't see in my table or if you've found lower prices on brands I've evaluated, just comment with details!

Product* Container Size (lb) Serving Size (g) Servings per Container Protein per Serving (g) Net Carbs per Serving (g) Cost of Container ($) Protein Cost ($/g) Net Carbs to Protein Ratio Notes
Body Fortress Whey Isolate 1.95 36.00 24.57 30.00 1.00 15.98 0.022 0.033 Contains carageenan
GNC Pro (1.04 lb) 1.04 34.00 13.87 24.00 5.00 22.99 0.069 0.208
GNC Pro (7 lb) 7.00 35.50 89.44 24.00 5.00 70.52 0.033 0.208
GNC Pro Amp (1.22 lb) 1.22 79.00 7.00 60.00 6.00 34.99 0.083 0.100
GNC Pro Amp (3 lb) 3.00 79.00 17.23 60.00 6.00 75.99 0.074 0.100
Jay Robb Whey Isolate (24 oz) 1.50 30.00 22.68 25.00 1.00 36.39 0.064 0.040 Grassfed**, no artificials, non-GMO, GF
Jay Robb Whey Isolate (80 oz) 5.00 30.00 75.60 25.00 1.00 99.97 0.053 0.040
ON 100% Whey GS (2 lb) 2.00 30.40 29.84 24.00 3.00 28.79 0.040 0.125
ON 100% Whey GS (5 lb) 5.00 30.40 74.60 24.00 3.00 59.69 0.033 0.125
ON Classic Whey 5.00 29.40 77.14 21.00 3.00 85.99 0.053 0.143 4 types of protein
ON Natural 100% Whey GS (2 lb) 2.00 32.00 28.35 24.00 5.00 27.99 0.041 0.208 No artificial sweeteners
ON Natural 100% Whey GS (5 lb) 5.00 32.00 70.87 24.00 5.00 48.62 0.029 0.208
Six Star Whey Isolate 1.54 36.00 19.40 30.00 2.00 19.97 0.034 0.067 Contains creatine
Six Star Whey Protein 2.00 42.00 21.60 30.00 8.00 18.97 0.029 0.267
Syntrax Essence 2.25 28.00 36.45 23.00 0.00 56.95 0.068 0.000 Contains soy
Syntrax Nectar 2.00 25.00 36.29 23.00 0.00 59.95 0.072 0.000 Fruit flavors
Trutein (2.5 lb) 2.50 34.00 33.35 23.00 2.50 30.99 0.040 0.109 Contains Omega 3s and 3 types of protein
Trutein (5 lb) 5.00 34.00 66.70 23.00 2.50 59.95 0.039 0.109
Unicity Lean Complete 1.22 36.80 15.02 18.00 7.00 45.00 0.166 0.389 Contains vitamins
*Whey protein, chocolate, unless otherwise stated; cheapest price found on Amazon.com or mfg website
**Grassfed doesn't matter for isolate, though, only concentrate

As you can see, Body Fortress Whey Isolate is the cheapest per gram of protein (and doesn't contain creatine like other BF products). Both Syntrax products have zero net carbs, but are certainly not the cheapest. In the end what matters is taste, because if it's nasty, I won't use it! And what good is a protein powder that you don't use?!

Saturday, November 16, 2013

Über coconut muffins

Adapted from http://wholelifestylenutrition.com/recipes/coconut-pumpkin-bread/

I found this recipe and thought to myself, "this bread could be coconuttier." And I was right. Boy, was I right.  I made some initial changes and then thought of some more that would be even better. So here's what I highly recommend you try:

3/4 C coconut flour
1/4 C almond meal
1/2 t Kosher salt
1 t baking soda
3-4 T unsweetened coconut shreds
3 T coconut sugar, divided
4 large eggs
1 cup coconut milk (regular, not light, shaken or stirred well)
1 T to 1/4 cup coconut oil (melted and cooled, since coconut milk is fatty, you could get away with very little oil IMO)

Preheat oven to 350°F. If you're not using a non-stick muffin tin, grease your tin. I recommend a giant-muffin tin for 6 large muffins. Whisk together everything through the coconut shreds and 2 T of the coconut sugar, making sure to crush any lumps in the flours or sugar. Make a well in the center and add the wet ingredients to it. Discard your whisk - it will not for for this next part! Using a large spoon, stir everything together really well. Divide into muffin tins and dust with the remaining 1 T of coconut sugar. Bake for 25 min, until the edges are golden and a toothpick comes out clean.

Nutrition facts will depend on how much coconut oil and shredded coconut you use, but here's an estimate for 3 eggs (I think 4 would be best after all), 2 T coconut sugar (needs more sweetness), 1/4 C coconut oil, and 3 T unsweetened coconut shreds, with the rest the same.

Makes 6 muffins.

Friday, June 28, 2013

Ingredients

Yup, that's mah fridge.
I just wanted to talk ingredients for a moment and explain some of my choices. When you cook, you should consider all of your ingredients carefully. This is especially true if you have any kind of dietary restrictions or considerations. You don't want to be throwing things into a recipe with abandon and then at the end, freak out when it has tons of calories or sodium or whatnot. You also want to make sure that what you put in your recipe tastes good! Otherwise, what's the point? On that note:

Butter
I always use salted butter. Always. I do this for two reasons. One, I like salt. Two, salted butter keeps better. I like to leave some butter out at room temperature for spreadability reasons, and salted butter will last longer than unsalted. Now, if you have health issues that require you to restrict your sodium intake, use unsalted butter! Also, don't use margarine. Just don't. EAT THE BUTTER.
UPDATE: I just did a bunch of research on salted vs. unsalted for baking and I think I'm going to try unsalted European-style butter in my next recipe and see what happens.
UPDATE #2: I'm using Kerry Gold Irish unsalted grass-fed butter for everything now. I get a 3-pack at Costco for a very reasonable price and wow it's delicious (I read that unsalted butter is fresher and I really think that's true). I put one in the fridge and keep the other two in the freezer until I'm ready for them. I am an unsalted butter convert.

Shallots
Shallots have a lovely, delicate onion flavor. I use them almost exclusively in place of onions because I have issues with strong onion flavor (I love it, but it can trigger a migraine... lovely, right?). I use onions for times when I need a larger piece of stuff, like for fajitas, but then I cook them very well. Also, caramelized onions. Anyway, if you've never tried cooking with shallots, I highly recommend it. They are often used in restaurant cooking. If you've ever tried to duplicate a restaurant dish and couldn't figure out why it's just not quite right, try adding shallot (or like twice the amount of butter you might usually use).

Carrots/potatoes/stuff with peels
I never peel these. The other day, I went to my friend's house at snacktime and she was peeling carrots. I was like, "WTF are you doing?!" The skins of root vegetables in particular contain tons of nutrients. That's because the skins are in the dirt and the dirt has all the nutrients! Even on above-ground produce like squash and apples, the skins are both tasty and full of nutrients. You should only peel things if the skin is toxic (like mango) or tough (like avocado), or if you're making a fancy delicate recipe (like whipped potatoes). Now, if you're using non-organic produce (especially those from the bad list below), then by all means, peel it (the skin contains the highest concentration of pesticide residue). All that said, I don't particularly like sweet potato skins, so I peel those! No matter what, it all comes down to your taste. You won't get any nutrients from a thing you don't eat.

Organic foods
Use this list to figure out which foods are best purchased organic and which are safe to eat conventional. While the list specifies spinach and collard greens, I just buy all organic greens. I find it incredibly odd that conventional potatoes are unsafe, yet conventional sweet potatoes are fine.

Refined grains
Some of you who look at my blog might wonder why I use refined grains, rather than whole ones. Well, without getting too gross, I have Irritable Bowel Syndrome, so I need a lot of soluble fiber and very little insoluble fiber in my diet (which is reserved for the peels discussed above). When I first started on this weight-loss journey, I was eating a ton of whole grains and ended up having... problems (I had forgotten about my IBS for a long time since I was eating mostly refined grains while I was gaining all this weight). Anyway, in a lot of my recipes you can substitute whole grains for the refined ones, except in the Chao Ga; that requires starchy white rice.

Animal products
I do what I can, within my limited budget, to purchase ethical animal products. They are better for everyone involved. I spend more money on food than most Americans because I feel that what I put into my body is important and it should be good (in every sense of the word). But I'm not going to go broke buying a chicken that was raised in a spa, either. Grass-fed beef is healthier for you and the cow, organic free-range chickens just plain taste better, and pigs that ate whatever they wanted and rolled around in the mud all day become the most delicious bacon. Sometimes, the cost is prohibitive, so I try and find the next best thing and then look for a deal next time.

Wednesday, June 26, 2013

Banh Mi Wrap

Yeah, I said wrap. I'm not in the habit these days of having delicious crusty baguettes lying around, so my banh mi craving became a wrap. I made Chao Ga last night, and the leftover chicken was my inspiration for this amazingly delicious creation.
Banh Mi Wrap
Quick-Pickled Veg
1/2 C rice wine vinegar (or just regular old white vinegar)
1/4 C water
2 t sugar
1 t salt
about 1/4 C shredded carrot
1 small or 1/2 large shallot, thinly sliced
1 small jalapeño pepper, thinly sliced (you can leave these unpickled if you want, but don't leave them out!)

Heat the vinegar, water, sugar, and salt until the sugar and salt dissolve completely. Place the vegetables in a bowl and pour the warm liquid over them. Let sit for about 30 minutes, then drain. Note: add shredded daikon radish if you have some.

Wrap
tortilla or other wrapping apparatus
mayonnaise
thinly-sliced cucumber
leftover chicken or other meat or tofu (if you use tofu, cut it into small batons and toss it in mayo and some of the pickling liquid)
quick-pickled vegetables
fresh cilantro (I like LOTS of cilantro, as you can see from the photo)

Warm the tortilla over a medium flame on your gas stove (or I guess you could do it on a skillet, or if you MUST, in the microwave). Spread desired amount of mayonnaise (I used 1 full serving because I freaking love mayo) down the middle of the tortilla, then lay however much of the rest of your ingredients nicely on top (I used 3 oz. of chicken). Wrap it up and eat it. If you've got a baguette and the calories available to eat one, then by all means, do it up right!

For the meat filling, you can use all kinds of things. From ham to pâté to meatballs, almost anything will work. Just make sure whatever it you use isn't seasoned in a way that will clash with the lovely Vietnamese flavors.

Makes 1 wrap.

Tuesday, June 25, 2013

Almond Pancakes with Blood Orange Maple Butter

I bought some almond flour to make Bouchon Bakery's Plum Tart that I had seen posted on somethingawful, and I thought, "Hmm, this might be good in pancakes!" And it was! I used a mix of all-purpose flour and almond flour so that I could still have the texture of regular pancakes, but next time I think I will increase the amount of almond flour because they could have been more almondy.

I was almost out of maple syrup, so I decided to blend the last bit with some softened butter and blood orange zest. It was a good idea. I've had these blood oranges in my fridge for months, so they're really only still good for the zest; which is why I've been making blood orange butter lately!
We, of course, had bacon with our pancakes.
Almond Pancakes
1 C flour (decrease to 3/4 C if you want, and then follow the parentheses below)
1/2 C almond flour (increase to 3/4 C)
1 T baking powder
1 t salt
1 T sugar
1 egg
1-1/4 C milk
1 T melted coconut oil or butter, cooled

Preheat griddle. Whisk dry ingredients together in a large bowl. Add the wet ingredients and mix well until there are no lumps. Drop onto a hot griddle by 1/4 C. Cook until bubbles form all over, then flip and cook until brown. Keep warm in a low oven. Makes 10 pancakes.

Blood Orange Maple Butter
4 T butter, softened
zest of 1 blood orange (a regular orange would be fine)
2 T maple syrup

Mix everything together and slather on pancakes!


Wednesday, June 19, 2013

BBQ Chicken and Yogurt Potato Salad

I'm finally posting my super-amazing BBQ chicken "recipe." It starts with a marinade that I then boil down to make a sauce. A stroke of pure genius had me serving it with my yogurt potato salad and some broccoli that I roasted on the grill (just drizzle some olive oil over some broccoli and add some smashed garlic cloves, enclose in a foil pouch and ignore on the grill while the chicken cooks... and don't forget to squeeze half a lemon on it before serving like I did!).


Sorry the picture isn't so great... I forgot to snap one while the food was still in the kitchen where the good lighting is.

BBQ Chicken
Marinade/Sauce
Apple cider vinegar
Molasses
Brown sugar
Ketchup
Soy Sauce
Crushed red pepper flakes
Black peppercorns
Garlic cloves, smashed and peeled
Onion powder

Put these things into a very large ziploc bag and mix well. The proportions are up to you. I use about 4 cups of vinegar as the base. This is a tangy NC-inspired marinade/sauce. I also use quite a lot of the red pepper flakes so it's pretty spicy.

Once you've got the chicken on the grill, pour the leftover marinade into a saucepan and bring it to a boil. Turn down the heat and simmer it for a while, then strain it into a serving apparatus (I like using a squeeze bottle).

Chicken
A bunch of chicken, with bones and skin (I did a "Family Pack" of 4 drumsticks and 2 breasts)
Marinade from above
About 1 C applewood chips, soaked for 15 minutes

Marinate the chicken for at least 4 hours, letting it come to room temperature for no more than 2 hours before grilling. Get your grill going at a nice low steady heat. Put the applewood chips in a little foil bowl and stick that on the coals. If you have a gas grill, I don't know what you are supposed to do with wood chips, sorry. Wait a few minutes until the wood chips start to smoke. Pull the chicken out of the marinade and place it on the grill, skin-side down. Grill breasts first, since they take the longest (they will need about a 10-minute head start depending on size). Grill the chicken for a few minutes and flip. Move the chicken around the grill to get desired amount of char. Pull the chicken off once the thickest parts reach 160°F and let it rest for about 5 minutes to get up to 165°F, which is the temperature recommended for chicken.

Yogurt Potato Salad
2 lb red potatoes, cut into 1-inch pieces (I ended up with 30 oz after trimming off some weird parts)
1-1/2 T olive oil
1 medium shallot, diced
1 red bell pepper, large-diced
2 large or 4 small carrots, thinly sliced (cut large ones in half lengthwise)
1 C plain yogurt (Greek or regular, but Greek will make a thicker dressing)
Red wine vinegar to taste
1/2 t onion powder
1/2 t garlic powder
Salt and pepper

Put the potatoes in a pot and cover them with water. Drain them, then cover them with water again. Bring to a boil and cook the potatoes just until tender. It only takes a few minutes when the pieces are so small. Be careful not to overcook them! Drain the potatoes and then place back in the pot with the lid on so they absorb the last bit of moisture. If after a few minutes, they're still pretty damp, turn on a little heat. Very dry potatoes make the best salad. Pour the potatoes into a very large bowl and toss them with the olive oil. Stir in the veggies, then mix together the rest of the ingredients in a separate bowl before mixing into the salad. Refrigerate for a couple of hours, or better yet, overnight. If you want, add some chopped fresh herbs, like chives or flat-leaf parsley.

Potato salad Serves 6.

Monday, June 17, 2013

Grilled Salmon with Lentils and Chard

So, I've been watching Food Network again. I have come to like Anne Burrell's show, "Secrets of a Restaurant Chef." The other day, I watched her make some grilled salmon with meyer lemon compound butter and some stew-y lentil thing and I don't remember what else. Since I had some sockeye salmon in the freezer and lentils on the shelf, I decided to do a similar thing, but my own way of course. Oh and I had gotten a bag of "Kaleidoscope Chard" from TJs, which I thought would compliment the rest of the things. It did.
Lentils
Cooking Liquid
A couple of celery stalks, in large pieces
A couple of carrots, in large pieces
An onion or a couple of shallots, in large pieces
A couple of cloves of garlic, lightly smashed and peeled
White wine to taste
A few cups of water
1/2 cup green lentils, rinsed and picked through
Salt to taste

Lentils
1 T olive oil
1/4 C minced carrot
1/4 C minced celery (I used some of the leaves too, which was nice)
1 T minced shallot
1 clove garlic, minced
About 1/4 C lentil cooking liquid
Salt and pepper to taste

Start the lentils first because they have to cook for about 30 minutes. Put all ingredients in a saucepan and bring to a boil. Lower the heat and simmer for about 30 minutes, until the lentils are tender. Note: Anne used fennel, too, which would be nice, but I didn't have any.

Once the lentils are tender, pull out the big chunks of stuff and strain the lentils, reserving some of the cooking liquid. (At this point, I started cooking the salmon and chard.)

Heat the olive oil in a saute pan over medium heat. Add the carrot and cook for about 30 seconds because they take longer than the rest of the vegetables. Add the other vegetables and cook for about 1 minute, until they start to soften. Add the lentils and stir, turning the heat to low. If the lentils start to dry out, add some of the cooking liquid. Simmer for about 5 minutes. These lentils were amazing. Anne put bacon in hers, which is probably a good idea, too, but all my bacon got cooked that morning!

Compound Butter
2-4 T softened butter
Zest of 1 blood orange or citrus fruit of your choice
Crushed green peppercorns (I would have used pink if I'd had them)
Chopped fresh herbs if you have them
Salt to taste

Stir everything together until well-incorporated and keep at room temperature if you're going to use it within a couple of hours. Otherwise, refrigerate.

Salmon
2 salmon fillets (mine were about 1/3 lb each)
Salt and pepper
olive oil
Juice of the blood orange or citrus you zested for the butter

Let the salmon fillets come to room temperature, skin-side up so the skin dries out (the dry skin before cooking is one of Anne's seemingly favorite tricks for crispy fish skin). Get your grill going, be it charcoal or gas, to a medium-ish heat. Sprinkle the skin-side of the fillets with salt and pepper and then spray or drizzle with olive oil. Place the salmon skin-side down and grill for 4-6 minutes. Season the other side of the fillets and then flip, cooking to desired doneness (usually about 8 minutes per inch of thickness). Give the fillets a spritz with the citrus juice, and then top with desired amount of compound butter.

Chard
1 T olive oil
1 clove garlic, smashed and peeled
1 big bunch or bag of rainbow chard
Salt and pepper to taste
Blood orange or other citrus juice

Heat the olive oil and garlic in a large pan (I used my wok to be able to hold all the chard) over medium heat. Add the chard, salt, and pepper and cook down for about a minute, tossing constantly. Remove from heat and place a lid over the chard. Let it steam for about 5 minutes to finish. Remove the garlic and spritz with citrus juice.

Serves 2.

Thursday, May 23, 2013

Chao Ga

Chao ga is Vietnamese rice porridge, like congee, with chicken. It is some of the most comforting food I've ever put into my mouth. My brother recently ordered it at the best Vietnamese restaurant in town (Banh Mi So #1), and after I tasted it, I knew I had to try making it. Lucky for us all, today was chilly and rainy, and thus the perfect day for chao ga!

Chao Ga
Broth
1 whole chicken, quartered (use half a chicken if you don't want tons of leftovers)
4-5 cloves garlic, smashed and peeled
3-4 inches fresh ginger root, peeled and chunked
about 20 black peppercorns
1 T salt (or 1-2 T Vietnamese fish sauce, if you like that sort of thing... it's more authentic)
about 6 C cold water

Place the broth ingredients into a stockpot, using just enough water to cover everything (6 cups will be plenty for the porridge, add more as needed to make sure everything is submerged). Cover the pot and bring the liquid to a boil over high heat. Once boiling, reduce the heat and simmer for about 25 minutes, until the chicken meat is cooked (you can just pull it out and check it by piercing it - it's done when the juices run out clear). Pull the cooked chicken out of the pot, let it cool a bit, and remove the meat from the bones. Set the meat aside and place the bones back into the pot of broth. Simmer the broth with the bones, covered, for at least one hour.

Porridge
1/2 T sesame oil
1 small shallot, minced
2 t minced fresh ginger
1 large or 2 small garlic cloves, minced
1 C jasmine rice, rinsed and drained
broth from above
Vietnamese chili-garlic sauce
fried onion or shallot pieces (I am lazy, so I used fried onions from a can, but they're delicious, so sue me)
fresh cilantro

In a large saucepan, heat the sesame oil over medium heat. Add the shallot, ginger, and garlic and stir for about a minute. Add the rice and cook for another 30 seconds, stirring constantly. Strain the broth into the pot and bring to a boil (you may need to add water, depending on the consistency you would like... I think 6 cups of liquid to 1 cup of rice is good). Turn the heat down, cover, and simmer for 30-40 minutes, until the rice is very tender and the liquid starts to thicken. While the rice is cooking, shred the cooled chicken (yeah, I had a lot left over... on purpose).  Ladle the porridge into bowls and top with the chili-garlic sauce, desired amount of chicken, fried onion/shallot, and fresh cilantro.

Mix it all up and devour.

Serves 3 (very filling, could serve 4 with spring rolls!).

Wednesday, May 22, 2013

Salade Niçoise with Smoked Trout and Blood Orange Vinaigrette

Salade Niçoise is the queen of all salads. Contrary to popular belief, the part that makes it Niçoise is the olives. Gorgeous, tiny, salty Niçoise olives. Traditionally, canned tuna is the fishy topping of choice, but we've gotten totally hooked on Ducktrap Smoked Trout from Trader Joe's, so that's what's on my salad! The salad is pretty simple to make, but requires a bit of preparation. A good mis en place will help tremendously with the actual making of the salad. Also, make sure you're using the largest plates you've got!


Blood Orange Vinaigrette
juice of 1 blood orange (you can use orange, lemon, grapefruit, or a combination if you can't get blood oranges)
1 T red wine vinaiger
2 T olive oil
1 t Herbes de Provence (fresh would be best, but who has time for that?)
salt and pepper to taste

Mix all ingredients in a large bowl and let stand until you are ready to make the salad.

Salade Niçoise with Smoked Trout
2 eggs
2 medium vine tomatoes
6-10 oz baby red potatoes
8 oz haricots verts, or small green beans
large head or bag of butter or Boston lettuce (I like butter lettuce and radicchio blend)
about 20 Niçoise olives
1/2 small shallot, thinly sliced (or red onion slices)
1 filet of smoked trout or a can of tuna (preferably packed in olive oil) or fresh grilled fish or shrimp
2 T capers, drained

A few hours before you plan to eat, hard boil 2 eggs (of course I always make a bunch because YUM) and then put them in the fridge to chill.

Have a bowl of ice water ready. Bring a pot of water to a boil. Cut a small X in the skin at the bottom of the tomatoes. Carefully lower the tomatoes into the water and boil until the skin at the X starts to peel back. With a spider or slotted spoon, remove the tomatoes from the water and place them in the ice water. Do not discard the boiling water. Let the tomatoes rest in the ice water for a few minutes, then remove them so they don't get soggy. Once cooled, remove the skin and seeds and roughly chop what's left. By the way, these are called tomatoes concassé and since I'm not terribly fond of tomatoes, this is how I prefer them in my Salade Niçoise. You can just use fresh quartered tomatoes if you're of that persuasion, though.

Cut the potatoes into bite-sized pieces and boil them until they are tender. Remove them with a spider or slotted spoon to a bowl and drizzle, while still warm, with 1-2 tablespoons of the dressing. Again, do not discard the boiling water. You can either put the potatoes in the fridge to chill or serve them slightly warm, that part is up to you.

Place the haricots verts into the boiling water for about 1 minute, or until they start to become tender and bright green. Remove them to a fresh ice water bath to stop them cooking and retain their color. At this point, you can discard the boiling water. Remove the green beans after a minute, drain them well, and toss them with about a tablespoon of the dressing.

Place the lettuce into the large bowl you made the dressing in and toss it up well. Pile the dressed lettuce in the middle of your large plates. Quarter the chilled hard boiled eggs and arrange them along with the potatoes, haricots verts, tomatoes, and olives around the lettuce. Lay the shallot or onion slices on top of the lettuce in the middle. Break up the trout fillets into bite-sized pieces and place on top of the shallot slices. Sprinkle the salad with the capers. Serve with some nice bread!

Serves 2.

Thursday, May 2, 2013

Blackberry Beggar's Purse

My husband loves blackberries, so I picked some up to make him an anniversary dessert (we're doing our real anniversary celebration when we go to New York City the first week of June). Of course, on our actual anniversary, he suggested that we go out for pizza, so I made this the day after (last night). I had some puff pastry in the freezer. I don't remember why I bought it, but I figured blackberries and puff pastry can't be wrong. Years ago, there was a restaurant here that served a dark chocolate-cherry-walnut beggar's purse, which gave me the idea for what to do with these blackberries and puff pastry.

Blackberry Beggar's Purse
1/3 sheet frozen puff pastry
12 oz fresh blackberries, rinsed and dried
2-6 t sugar (depending on the sweetness of the berries and your taste)
gelato or whipped cream for serving (I went with Talenti Sicilian Pistachio YUM)

Thaw the puff pastry according to package directions. Preheat oven to 375°F. Cut the third of a sheet of puff pastry in two and roll each on a lightly floured surface into a 7- or 8-inch square. Place the puff pastry squares on a parchment-lined baking sheet (this I did not do, and transferring the filled sheets from the counter to the baking sheet was not very fun). Pile about half of the blackberries in the middle of each square (I saved a few berries for garnish) and sprinkle with sugar.
Don't do this. Put the pastry on the baking sheet first!
Fold the corners of the pastry in to the middle and pinch together. Use a little water if the corners don't stick together, or use egg wash (that seemed like a waste of an egg, but you could brush the pastry for a nice shine, too).
That one edge looks ragged because it was the edge of the puff pastry.
Bake for 25-30 minutes, until the pastry is golden. Serve with a scoop of gelato or a dollop of whipped cream and some fresh berries.

Makes 2 purses.

Scallion and Chèvre Frittata

When I went to Italy a long time ago, I stayed in this amazing villa surrounded by countryside. They grew their own lemons, olives, grapes, and scallions. They probably grew other stuff, too, but those were the things I noticed. One afternoon for lunch, the lady of the villa made an amazing frittata with just a ton of scallions, and a chunk of fresh bread on the side. A while back, while in the throws of replicating this frittata, inspired by my grandfather, I added slivers of cream cheese before popping it in the broiler. Then I realized, "cream cheese is good, but chèvre would be amazing." Add some fresh basil and... perfection.

Scallion and Chèvre Frittata
6 eggs
1 T half & half (or cream or milk)
1 T butter
6 scallions, chopped
2-3 oz fresh chèvre
6-8 large basil leaves
salt and pepper

Preheat the oven to broil. Beat the eggs and half & half with some salt and pepper until the consistency is uniform. Heat the butter over medium heat in a large oven-proof skillet and then add the scallions. Cook the scallions until they are slightly soft, just a couple of minutes.

Pour in the egg mixture and stir, bringing the cooked egg from the bottom in toward the middle and allowing the raw egg to settle and cook around the edges, like an omelet.

Once the bottom has set and the top is still slightly liquid, crumble the chèvre over the top and place the pan under the broiler until the frittata is golden brown and fluffy.

Meanwhile, chiffonade the basil and then sprinkle it over the frittata once it's done.

We split one frittata with a chunk of bread and salad for a meal, but you could cut it into several pieces for an appetizer or snack. You can also put leftover cold frittata into a sliced piece of baguette... so delicious.

Serves 2.

Wednesday, May 1, 2013

White Bean Hummus and Fridge Pickles

I couldn't fall asleep last night thinking of all the delicious and nutritious foods I wanted to make today. I bought some white beans because I'm trying to get more potassium and decided I could make "hummus" with them (it's just white bean dip, but hummus is more descriptive). My mouth started watering thinking of a wrap with white bean hummus and veggies. Then I thought, "I could pickle some of those veggies." Luckily, I was somehow psychic when I went shopping yesterday morning and I bought a pack of Persian cucumbers. Those plus the fresh jalapeños I had in the fridge equal perfect pickles.
Tortilla, white bean hummus, fridge pickles, shredded carrot, red bell pepper, spinach
White Bean Hummus
1 can white beans
4 cloves garlic
juice of 1 lemon
1 T olive oil
salt and pepper

Smash and peel the garlic cloves, drain the beans, and give them a whir together in a food processor. Add the lemon juice, salt and pepper to taste, and whir it again. With the food processor going, slowly drizzle in the olive oil (this makes a creamy emulsion).

Pop it in the fridge for a couple of hours to meld and chill. Spread it on a wrap or sandwich and enjoy. To serve on its own, drizzle some olive oil and sprinkle some chopped flat-leaf parsley over it. Great with baguette, pita, vegetables, and so many other things.

Fridge Pickles
2 C white vinegar
2 C water
2 t sugar
1 T salt
3 Persian cucumbers
8 jalapeños

Put everything except the veggies in a saucepan and bring just to a low boil. While that's happening, slice the cucumbers and jalapeños about 1/4" thick. Put the sliced veggies in a large mason jar or some other airtight glass container. Wash your hands very well after handling the jalapeños! Once the liquid has just begun to boil, pour it over the veggies so that they're completely covered. You can always add a bit more vinegar if you need to. Refrigerate for at least an hour before using. PLEASE NOTE these are not shelf-stable pickles - you MUST keep them refrigerated and use them within a week to be safe. If you just want some quick pickles, boil the veggies in the liquid for about 10 minutes, drain, chill, and eat!

Tuesday, April 30, 2013

Roasted Tomato Bisque

Last night we wanted grilled cheese and tomato soup. I have some Costco tomato soup in the freezer, but I decided I wanted to make some from scratch. Of course, I thought roasting fresh tomatoes would be superior to canned. I added some white wine and fresh aromatics. The secret to a creamy soup without a ton of calories is evaporated 2% milk. Somehow, evaporated 2% milk has the same amount of calories as evaporated skim milk, so that was my choice. It still has things added to it, but I thought maybe it would be less altered than the skim.
Roasted tomato bisque with grilled black forest ham & cheddar & chèvre on homemade bread
Roasted Tomato Bisque
2 1/2 lb vine tomatoes (choose organic if it's not too cost-prohibitive), halved with stem removed
oil spray
1 to 2 T butter
1 large yellow onion, chopped
2 large carrots, chopped
2 large celery stalks, chopped
4 cloves garlic, smashed and peeled
1/2 t dried thyme
1 C white wine (I used pinot grigio)
4 C chicken stock
1 can (12 oz) evaporated 2% milk
salt and pepper

Preheat your oven to 450°F. Lay tomatoes on a baking sheet, spray with oil, and sprinkle with salt and pepper. Roast for about 45 minutes, until tomatoes are soft and caramelized.

In a large pot over medium heat, melt the butter. Add the onion and cook until it starts to brown. Add the carrot, celery, garlic, and thyme and cook for another 5-10 minutes, until the carrot starts to soften. Pour in the wine, deglaze the pot, and bring it to a boil.

Let the wine cook down a bit (just a few minutes), then add the chicken stock and bring to a boil. Carefully add the tomatoes to the soup.

Deglaze the baking sheet with some liquid from the pot and pour it into the soup. Add salt and pepper to taste. Let the soup simmer until the carrots are tender. Puree the soup either with an immersion blender or by ladling it into a blender.

After blending, strain it for a less rustic texture. I like it rustic, so I didn't strain it. Stir in the evaporated milk and bring it back up to temperature if you used a regular blender because it will have cooled.


Serve (preferably with grilled cheese)!

Serves 6 (that's 3 big ladle-fulls).

Thursday, April 25, 2013

Marinated Tri-Tip, Zucchini Latkes, and Roasted Red Potatoes

I was having one of my weirder cravings today, and that was for HP Fruity sauce. I had already planned to cook the tri-tip I had in the fridge, so I decided to marinate it in the HP Fruity along with some soy sauce (of course) and malt vinegar. To go with it, I made zucchini latkes (trying everything to get my husband to like zucchini!) and roasted red potatoes. The potatoes take the longest (about 40 minutes), so I started those first.
There's one zucchini latke missing because I forgot to take a picture of my plate first!
Roasted Red Potatoes
1 1/2 lb baby red potatoes
oil spray
salt and pepper

Preheat oven to 425°F. Wash the potatoes and cut them into 2-inch chunks. Lay them out on a baking sheet and pop them in the oven for a couple of minutes if they're not completely dry. Once dry, spray the potato chunks with oil (I used olive), and sprinkle with salt and pepper. Bake for about 40 minutes. This makes 4 servings, so you'll either have leftovers or use fewer potatoes. I like leftover potatoes (I ate them for breakfast today with cheese, jalapeños, sour cream, and a fried egg).

Zucchini Latkes
1 large (about 8 oz or 225 g) zucchini, shredded
1 t salt
1 shallot, shredded
1 egg
1/4 C bread crumbs or crushed matzo
pepper

In a large bowl, sprinkle the salt on the shredded zucchini and let sit for 10-20 minutes, then squeeze out the excess liquid. You could do this in a fine mesh strainer, but I didn't feel like washing another dish. Add the rest of the ingredients and mix well. Spoon onto a warm skillet or griddle (sprayed with oil if not non-stick) and press flat. Cook on both sides until browned and tender. Serve with sour cream. Makes 6 5-inch latkes, which I decided were 2 servings.

Seared & Roasted Marinated Tri-Tip
1-ish lb tri-tip or other lean beef
HP Fruity (or just HP sauce or A-1, I suppose)
soy sauce
malt vinegar
garlic powder
black pepper

Pour all of the things over the steak and stir it around. Let it marinate for a few hours, flipping at least once. Sear in a hot pan and finish in the oven at 325°F.  Once the potatoes were finished, I pulled them out and turned the oven down, then put the steak in for about 8 minutes. The time in the oven depends on how you like your meat cooked. This was unintentionally medium-well, FYI. There were 3 pieces of meat in my 1.18-lb package, so this was 3 servings.
This is only the beginning of the sear, btw.
DINNER!!!


Wednesday, April 24, 2013

Baked Tonkatsu and Sesame Garlic Brussels Sprouts

Normally, tonkatsu is fried and super delicious. Now, I have nothing against frying or fat or oil or anything, but fat has more calories than carbohydrates or protein. So I decided to see if baking it works. And it does. Baked tonkatsu is not as good as fried, of course, but it's still quite delicious and has far fewer calories. Typically, it's served with steamed white rice and raw shredded green cabbage. I decided that the panko bread crumbs were enough carbohydrates that rice was unnecessary, and that raw shredded green cabbage is boring, so I cooked up some shredded Brussels spouts with garlic and sesame oil.

Baked Tonkatsu
1 lb boneless pork cutlets
1/4 C all-purpose flour
1 egg
1 C panko bread crumbs
salt and pepper
coconut oil spray (or another high-heat oil)

Let me first say that you probably won't use all of the flour or bread crumbs, so you can adjust those accordingly after you've made it once. Every pork cutlet is different, though, so put more in your dishes to be safe so you don't have to wash your hands and refill mid-dredge. I ended up using about 1/6 C of flour and not quite 1 C of bread crumbs (I think... the package was not labeled correctly, so I went by weight when I input it in MFP's recipe builder).

Preheat your oven to 450°F. Set a wire rack on a cookie sheet and spray the rack with oil.

Pour the flour onto a plate, add salt and pepper, and mix together. Beat the egg in a small bowl (you may want to add a little water for consistency) with a touch of salt and pepper. Pour the bread crumbs into a bowl that is large enough to accommodate the cutlets.

Coat a cutlet in the seasoned flour, shake off the excess, then dunk it in the egg, let the excess egg drip off, then toss it in the bread crumbs until it's well-coated. Place it on the wire rack and repeat with the remaining cutlets. Put them in the oven for about 12 minutes, turning once. Oven temperatures can vary, so if they aren't browning, turn your oven all the way up for an additional few minutes. I think next time I'm going to spray them with oil just for that hint of fried flavor.

Before serving, cut the tonkatsu into strips. Serve with katsu sauce and sesame garlic Brussels sprouts.

Katsu Sauce
2 T ketchup
1 T molasses
2 T ponzu sauce (you could use soy sauce, but ponzu is better)
1/4 t garlic powder
1/4 t black pepper

Mix everything together! Usually I add 2 T unsweetened applesauce as well, but I'm out right now. You should add it if you have it.

Sesame Garlic Brussels Sprouts
1 T sesame oil
4 small cloves of garlic
1 10-oz bag shaved Brussels sprouts (I suppose you could get whole sprouts and shave them yourself)
salt and pepper
1 T soy sauce
Sesame seeds for garnish

Heat the sesame oil in a large skillet over low heat. Smash and peel the garlic, then slice it thinly. Add the garlic and Brussels sprouts to the oil and season with a little salt (just a bit because of the soy sauce later) and pepper. Cook over low heat for about 20 minutes, stirring occasionally. Stir in the soy sauce at the end. Spoon into bowls and garnish with sesame seeds (I did both black and white for fun).

Put it all together:


Serves 2.

Tuesday, April 23, 2013

Grilled Marinated Chicken and Stuff

This chicken was SOO good. I apologize for not having pictures of the meal once completed (though you do get bonus leftovers pics), but it actually wasn't terribly pretty. I was craving fajitas, but didn't want to cut up a bunch of chicken or cook indoors, so I decided to leave the chicken breasts intact, marinate them, and make my husband grill them!

Marinade:
orange juice
soy sauce
white vinegar
sunflower oil (just a touch)
garlic powder
ground cumin
ground coriander seed
cayenne pepper
black pepper

Place all ingredients in whatever proportion you want into a large zipper bag and mix it around a bit. Add in some boneless, skinless chicken breasts and refrigerate for at least 6 hours. You could use lime juice instead of orange, but I needed to use up some orange juice that I bought for my dad since we don't drink it.

Accompaniments:
bell pepper, cut into strips
jalapeño pepper, seeded and cut into strips
yellow onion, sliced
olive oil spray
salt & pepper
can of black beans
shredded Mexican cheese blend (I bought a light blend and can't tell any difference)
sliced avocado
tortillas

Place the veggies on a large sheet of aluminum foil that has been sprayed with olive oil, then spray the veggies. Sprinkle salt and pepper over them and toss. Seal up the foil to make a pouch for grillin'.

Grill the chicken and veggie pouch over high flame. We like our meat kind of charred and our veggies caramelized. Make sure you flip everything at some point. Cook the chicken until an instant-read thermometer registers at least 160° F, then let it rest for 5 minutes while you heat up the beans and tortillas. Note: I heat tortillas directly over the flame on my gas stove. Slice up the chicken and plate it with the grilled veggies, beans topped with shredded cheese, avocado, and tortilla.

Nutrition info:


Bonus: Leftovers!
Poor little (big, actually) blurry chicken breast
In a very large bowl, I have:
2 C butter lettuce
2 C baby spinach
1/4 C light shredded Mexican cheese blend
1/2 C shredded carrot
1/2 a red bell pepper, sliced
6 oz leftover chicken breast, cubed


Avocado ranch dressing:
1/2 an avocado, mashed
1 T Greek yogurt
juice of 1/2 a lemon
1/2 t red wine vinegar
1/2 t Buttermilk Ranch Seasoning from Penzey's Spices.

Monday, April 22, 2013

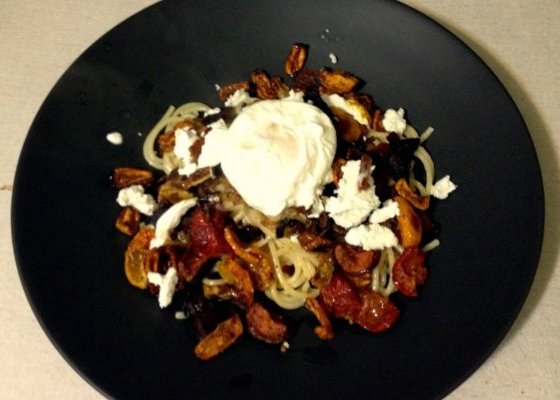
Spaghetti with Good Stuff™

I don't know what happened, but it appears that Blogger has lost all the photos from my older posts. So I'll be steadily going back and replacing those in case anyone wants to see my old carefree recipes.

A couple of weeks ago, I was browsing MFP and came across a really cool recipe for Creamy Avocado Pasta (it was in the recipes forum with a link to someone's Pinterest site, but I found the original). It was way too intriguing not to try, so I promptly picked up some avocados and mini heirloom tomatoes. I'm not a huge tomato fan, but let me tell you how much I now love roasted mini heirloom tomatoes! They are tart, sweet, juicy, and their texture is very pleasing.

Well, I had planned to make avocado pasta again when my father was here last weekend, but that... didn't happen... and I ended up with mini heirloom tomatoes I needed to use (aka roast). The shrimp I had defrosting to go on top had gone bad, so I decided to try something different. Pasta still seemed like a good choice, and then my brain said to me "bacon goes really well with tomatoes." Sometimes my brain is really smart. Then, I remembered the fresh chèvre I had in the fridge. YUM. But I didn't feel like the dish was complete until after reading yet another "what's for dinner" thread on MFP in which someone posted about caramelized onions. Perfect! The final step was getting a bit more protein into the dish... and I remembered how this one time, I poached some eggs in white wine. OMG exciting! I must warn you, though, that this is not exactly low-calorie, but things can be adjusted.

Spaghetti with Good Stuff™
1 lb mini heirloom tomatoes (or any small tomato)
Olive or coconut oil spray
1/2 medium yellow onion
1 T butter
4 strips of delicious bacon (I use black forest bacon from Trader Joe's)
1/3 package (about 5.3 oz dry) spaghetti
White wine for poaching
1 T white vinegar
2 eggs
1 T olive oil
4 T fresh chèvre, crumbled
Salt and pepper

Preheat the oven to 300°F. Quarter the tomatoes and lay them out on a parchment-lined cookie sheet. Spray the quarters lightly with oil spray and then sprinkle with salt and pepper. Place the tomatoes in the oven for one hour.

Meanwhile, thinly slice the onion. Melt the butter on low heat and then add the onions and a little salt and pepper. Cook, stirring occasionally, until the onions turn brown and sweet. They will take around 30 minutes, so time them accordingly.

When the onions have cooked for 10 minutes, start the bacon on low heat and leave it, turning occasionally, until its fully cooked. You can either crumble it after it's cooked or cut it up and then cook it. Either way is fine. Alternatively, you could bake the bacon ahead of time, which is what I do. I bake a whole package of bacon on a rack on a cookie sheet at 400°F for 20-ish minutes and then keep it in the fridge until I'm ready to use it.

When there are 20 minutes left on the tomatoes, start boiling a heavily salted pot of water (it should taste like sea water - that's the Italian secret!). Once the water is boiling, drop in the spaghetti and let it boil for about 10 minutes, according to package instructions, until it is "al dente."

The thing you want to do last is poach the eggs. If you've never poached eggs, I recommend doing a google search just to see some techniques. I use a very small saucepan for this so that I don't have to use a lot of wine. Fill the saucepan with enough wine that it will cover the eggs when you put them in; it will need to be about 2 inches. If you run out of wine, you can supplement with water. Add 1 T of white vinegar and bring the liquid to a low boil over medium heat. Crack one egg at a time into a small dish (like a little ramekin), and then drop it into the hot liquid. Repeat with the other egg and let them poach until they reach a consistency you like. You can poke them with a spoon to check the jiggle.

While the eggs finish poaching, everything else should have finished, so drain the pasta and toss it in the olive oil. Portion it onto two plates and then top with the onions, crumbled bacon, tomatoes, and chèvre. Remove the eggs with a slotted spoon and place on top of each dish. Enjoy with a nice salad.

Serves 2.

Sunday, April 21, 2013

Ch ch ch ch changes (and granola!)

This blog is turning over a new leaf. The recipes contained hereafter in this blog will be delicious and also healthy. Let me clarify that by healthy, I mean good for the body and good for the soul... I mean real food for real people. I don't mean "this week eggs are bad," or "fat-free cream cheese," or "gluten-free," or "paleo/primal/caveman/throwawayyourflourAAAAH!"

Let me start with something simple. I've been making my own granola, loosely based on Alton Brown's recipe. Store-bought granola is expensive and can be full of sugar and calories (and cinnamon GROSS). My coconut & black sesame granola is none of those things.


Coconut & Black Sesame Granola
3 C (240 g) old fashioned rolled oats 
50 g black sesame seeds* 
45 g unsweetened coconut shreds 
1/2 C date puree** 
1/4 C coconut milk*** 
big pinch of salt 

Mix everything together in a big bowl (use your hands to make sure everything is well-incorporated), then spread it out on a cookie sheet and bake at 250°F for 1 hour and 15 minutes, turning occasionally. It's not very sweet, but it's delicious, especially with some Greek yogurt and fruit (banana, pineapple, and/or mango in particular!).

Makes 10 servings. 

* You can find black sesame seeds for a great price at international markets!
** Date puree from http://healthykitchenguide.com/using-medjool-dates-instead-of-sugar-in-recipes/ (I made about 2 cups and keep what's left in the fridge). 
*** I used light coconut milk this time because it's what I happened to have on hand... because for some reason, Trader Joe's only carries light. /grumblegrumble