Friday, June 28, 2013

Ingredients

Yup, that's mah fridge.
I just wanted to talk ingredients for a moment and explain some of my choices. When you cook, you should consider all of your ingredients carefully. This is especially true if you have any kind of dietary restrictions or considerations. You don't want to be throwing things into a recipe with abandon and then at the end, freak out when it has tons of calories or sodium or whatnot. You also want to make sure that what you put in your recipe tastes good! Otherwise, what's the point? On that note:

Butter
I always use salted butter. Always. I do this for two reasons. One, I like salt. Two, salted butter keeps better. I like to leave some butter out at room temperature for spreadability reasons, and salted butter will last longer than unsalted. Now, if you have health issues that require you to restrict your sodium intake, use unsalted butter! Also, don't use margarine. Just don't. EAT THE BUTTER.
UPDATE: I just did a bunch of research on salted vs. unsalted for baking and I think I'm going to try unsalted European-style butter in my next recipe and see what happens.
UPDATE #2: I'm using Kerry Gold Irish unsalted grass-fed butter for everything now. I get a 3-pack at Costco for a very reasonable price and wow it's delicious (I read that unsalted butter is fresher and I really think that's true). I put one in the fridge and keep the other two in the freezer until I'm ready for them. I am an unsalted butter convert.

Shallots
Shallots have a lovely, delicate onion flavor. I use them almost exclusively in place of onions because I have issues with strong onion flavor (I love it, but it can trigger a migraine... lovely, right?). I use onions for times when I need a larger piece of stuff, like for fajitas, but then I cook them very well. Also, caramelized onions. Anyway, if you've never tried cooking with shallots, I highly recommend it. They are often used in restaurant cooking. If you've ever tried to duplicate a restaurant dish and couldn't figure out why it's just not quite right, try adding shallot (or like twice the amount of butter you might usually use).

Carrots/potatoes/stuff with peels
I never peel these. The other day, I went to my friend's house at snacktime and she was peeling carrots. I was like, "WTF are you doing?!" The skins of root vegetables in particular contain tons of nutrients. That's because the skins are in the dirt and the dirt has all the nutrients! Even on above-ground produce like squash and apples, the skins are both tasty and full of nutrients. You should only peel things if the skin is toxic (like mango) or tough (like avocado), or if you're making a fancy delicate recipe (like whipped potatoes). Now, if you're using non-organic produce (especially those from the bad list below), then by all means, peel it (the skin contains the highest concentration of pesticide residue). All that said, I don't particularly like sweet potato skins, so I peel those! No matter what, it all comes down to your taste. You won't get any nutrients from a thing you don't eat.

Organic foods
Use this list to figure out which foods are best purchased organic and which are safe to eat conventional. While the list specifies spinach and collard greens, I just buy all organic greens. I find it incredibly odd that conventional potatoes are unsafe, yet conventional sweet potatoes are fine.

Refined grains
Some of you who look at my blog might wonder why I use refined grains, rather than whole ones. Well, without getting too gross, I have Irritable Bowel Syndrome, so I need a lot of soluble fiber and very little insoluble fiber in my diet (which is reserved for the peels discussed above). When I first started on this weight-loss journey, I was eating a ton of whole grains and ended up having... problems (I had forgotten about my IBS for a long time since I was eating mostly refined grains while I was gaining all this weight). Anyway, in a lot of my recipes you can substitute whole grains for the refined ones, except in the Chao Ga; that requires starchy white rice.

Animal products
I do what I can, within my limited budget, to purchase ethical animal products. They are better for everyone involved. I spend more money on food than most Americans because I feel that what I put into my body is important and it should be good (in every sense of the word). But I'm not going to go broke buying a chicken that was raised in a spa, either. Grass-fed beef is healthier for you and the cow, organic free-range chickens just plain taste better, and pigs that ate whatever they wanted and rolled around in the mud all day become the most delicious bacon. Sometimes, the cost is prohibitive, so I try and find the next best thing and then look for a deal next time.

Wednesday, June 26, 2013

Banh Mi Wrap

Yeah, I said wrap. I'm not in the habit these days of having delicious crusty baguettes lying around, so my banh mi craving became a wrap. I made Chao Ga last night, and the leftover chicken was my inspiration for this amazingly delicious creation.
Banh Mi Wrap
Quick-Pickled Veg
1/2 C rice wine vinegar (or just regular old white vinegar)
1/4 C water
2 t sugar
1 t salt
about 1/4 C shredded carrot
1 small or 1/2 large shallot, thinly sliced
1 small jalapeño pepper, thinly sliced (you can leave these unpickled if you want, but don't leave them out!)

Heat the vinegar, water, sugar, and salt until the sugar and salt dissolve completely. Place the vegetables in a bowl and pour the warm liquid over them. Let sit for about 30 minutes, then drain. Note: add shredded daikon radish if you have some.

Wrap
tortilla or other wrapping apparatus
mayonnaise
thinly-sliced cucumber
leftover chicken or other meat or tofu (if you use tofu, cut it into small batons and toss it in mayo and some of the pickling liquid)
quick-pickled vegetables
fresh cilantro (I like LOTS of cilantro, as you can see from the photo)

Warm the tortilla over a medium flame on your gas stove (or I guess you could do it on a skillet, or if you MUST, in the microwave). Spread desired amount of mayonnaise (I used 1 full serving because I freaking love mayo) down the middle of the tortilla, then lay however much of the rest of your ingredients nicely on top (I used 3 oz. of chicken). Wrap it up and eat it. If you've got a baguette and the calories available to eat one, then by all means, do it up right!

For the meat filling, you can use all kinds of things. From ham to pâté to meatballs, almost anything will work. Just make sure whatever it you use isn't seasoned in a way that will clash with the lovely Vietnamese flavors.

Makes 1 wrap.

Tuesday, June 25, 2013

Almond Pancakes with Blood Orange Maple Butter

I bought some almond flour to make Bouchon Bakery's Plum Tart that I had seen posted on somethingawful, and I thought, "Hmm, this might be good in pancakes!" And it was! I used a mix of all-purpose flour and almond flour so that I could still have the texture of regular pancakes, but next time I think I will increase the amount of almond flour because they could have been more almondy.

I was almost out of maple syrup, so I decided to blend the last bit with some softened butter and blood orange zest. It was a good idea. I've had these blood oranges in my fridge for months, so they're really only still good for the zest; which is why I've been making blood orange butter lately!
We, of course, had bacon with our pancakes.
Almond Pancakes
1 C flour (decrease to 3/4 C if you want, and then follow the parentheses below)
1/2 C almond flour (increase to 3/4 C)
1 T baking powder
1 t salt
1 T sugar
1 egg
1-1/4 C milk
1 T melted coconut oil or butter, cooled

Preheat griddle. Whisk dry ingredients together in a large bowl. Add the wet ingredients and mix well until there are no lumps. Drop onto a hot griddle by 1/4 C. Cook until bubbles form all over, then flip and cook until brown. Keep warm in a low oven. Makes 10 pancakes.

Blood Orange Maple Butter
4 T butter, softened
zest of 1 blood orange (a regular orange would be fine)
2 T maple syrup

Mix everything together and slather on pancakes!


Wednesday, June 19, 2013

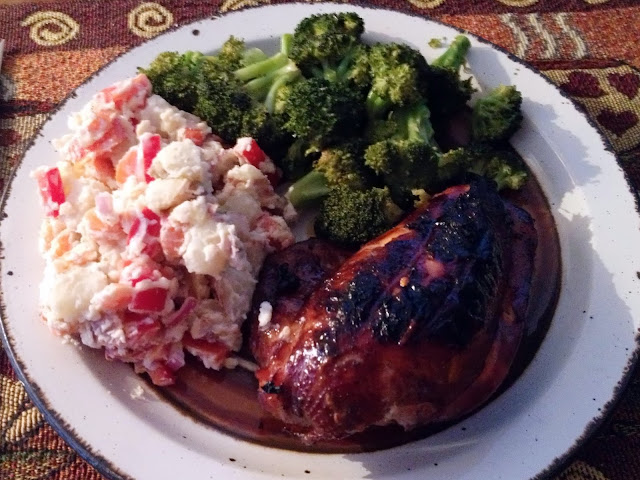
BBQ Chicken and Yogurt Potato Salad

I'm finally posting my super-amazing BBQ chicken "recipe." It starts with a marinade that I then boil down to make a sauce. A stroke of pure genius had me serving it with my yogurt potato salad and some broccoli that I roasted on the grill (just drizzle some olive oil over some broccoli and add some smashed garlic cloves, enclose in a foil pouch and ignore on the grill while the chicken cooks... and don't forget to squeeze half a lemon on it before serving like I did!).


Sorry the picture isn't so great... I forgot to snap one while the food was still in the kitchen where the good lighting is.

BBQ Chicken
Marinade/Sauce
Apple cider vinegar
Molasses
Brown sugar
Ketchup
Soy Sauce
Crushed red pepper flakes
Black peppercorns
Garlic cloves, smashed and peeled
Onion powder

Put these things into a very large ziploc bag and mix well. The proportions are up to you. I use about 4 cups of vinegar as the base. This is a tangy NC-inspired marinade/sauce. I also use quite a lot of the red pepper flakes so it's pretty spicy.

Once you've got the chicken on the grill, pour the leftover marinade into a saucepan and bring it to a boil. Turn down the heat and simmer it for a while, then strain it into a serving apparatus (I like using a squeeze bottle).

Chicken
A bunch of chicken, with bones and skin (I did a "Family Pack" of 4 drumsticks and 2 breasts)
Marinade from above
About 1 C applewood chips, soaked for 15 minutes

Marinate the chicken for at least 4 hours, letting it come to room temperature for no more than 2 hours before grilling. Get your grill going at a nice low steady heat. Put the applewood chips in a little foil bowl and stick that on the coals. If you have a gas grill, I don't know what you are supposed to do with wood chips, sorry. Wait a few minutes until the wood chips start to smoke. Pull the chicken out of the marinade and place it on the grill, skin-side down. Grill breasts first, since they take the longest (they will need about a 10-minute head start depending on size). Grill the chicken for a few minutes and flip. Move the chicken around the grill to get desired amount of char. Pull the chicken off once the thickest parts reach 160°F and let it rest for about 5 minutes to get up to 165°F, which is the temperature recommended for chicken.

Yogurt Potato Salad
2 lb red potatoes, cut into 1-inch pieces (I ended up with 30 oz after trimming off some weird parts)
1-1/2 T olive oil
1 medium shallot, diced
1 red bell pepper, large-diced
2 large or 4 small carrots, thinly sliced (cut large ones in half lengthwise)
1 C plain yogurt (Greek or regular, but Greek will make a thicker dressing)
Red wine vinegar to taste
1/2 t onion powder
1/2 t garlic powder
Salt and pepper

Put the potatoes in a pot and cover them with water. Drain them, then cover them with water again. Bring to a boil and cook the potatoes just until tender. It only takes a few minutes when the pieces are so small. Be careful not to overcook them! Drain the potatoes and then place back in the pot with the lid on so they absorb the last bit of moisture. If after a few minutes, they're still pretty damp, turn on a little heat. Very dry potatoes make the best salad. Pour the potatoes into a very large bowl and toss them with the olive oil. Stir in the veggies, then mix together the rest of the ingredients in a separate bowl before mixing into the salad. Refrigerate for a couple of hours, or better yet, overnight. If you want, add some chopped fresh herbs, like chives or flat-leaf parsley.

Potato salad Serves 6.

Monday, June 17, 2013

Grilled Salmon with Lentils and Chard

So, I've been watching Food Network again. I have come to like Anne Burrell's show, "Secrets of a Restaurant Chef." The other day, I watched her make some grilled salmon with meyer lemon compound butter and some stew-y lentil thing and I don't remember what else. Since I had some sockeye salmon in the freezer and lentils on the shelf, I decided to do a similar thing, but my own way of course. Oh and I had gotten a bag of "Kaleidoscope Chard" from TJs, which I thought would compliment the rest of the things. It did.
Lentils
Cooking Liquid
A couple of celery stalks, in large pieces
A couple of carrots, in large pieces
An onion or a couple of shallots, in large pieces
A couple of cloves of garlic, lightly smashed and peeled
White wine to taste
A few cups of water
1/2 cup green lentils, rinsed and picked through
Salt to taste

Lentils
1 T olive oil
1/4 C minced carrot
1/4 C minced celery (I used some of the leaves too, which was nice)
1 T minced shallot
1 clove garlic, minced
About 1/4 C lentil cooking liquid
Salt and pepper to taste

Start the lentils first because they have to cook for about 30 minutes. Put all ingredients in a saucepan and bring to a boil. Lower the heat and simmer for about 30 minutes, until the lentils are tender. Note: Anne used fennel, too, which would be nice, but I didn't have any.

Once the lentils are tender, pull out the big chunks of stuff and strain the lentils, reserving some of the cooking liquid. (At this point, I started cooking the salmon and chard.)

Heat the olive oil in a saute pan over medium heat. Add the carrot and cook for about 30 seconds because they take longer than the rest of the vegetables. Add the other vegetables and cook for about 1 minute, until they start to soften. Add the lentils and stir, turning the heat to low. If the lentils start to dry out, add some of the cooking liquid. Simmer for about 5 minutes. These lentils were amazing. Anne put bacon in hers, which is probably a good idea, too, but all my bacon got cooked that morning!

Compound Butter
2-4 T softened butter
Zest of 1 blood orange or citrus fruit of your choice
Crushed green peppercorns (I would have used pink if I'd had them)
Chopped fresh herbs if you have them
Salt to taste

Stir everything together until well-incorporated and keep at room temperature if you're going to use it within a couple of hours. Otherwise, refrigerate.

Salmon
2 salmon fillets (mine were about 1/3 lb each)
Salt and pepper
olive oil
Juice of the blood orange or citrus you zested for the butter

Let the salmon fillets come to room temperature, skin-side up so the skin dries out (the dry skin before cooking is one of Anne's seemingly favorite tricks for crispy fish skin). Get your grill going, be it charcoal or gas, to a medium-ish heat. Sprinkle the skin-side of the fillets with salt and pepper and then spray or drizzle with olive oil. Place the salmon skin-side down and grill for 4-6 minutes. Season the other side of the fillets and then flip, cooking to desired doneness (usually about 8 minutes per inch of thickness). Give the fillets a spritz with the citrus juice, and then top with desired amount of compound butter.

Chard
1 T olive oil
1 clove garlic, smashed and peeled
1 big bunch or bag of rainbow chard
Salt and pepper to taste
Blood orange or other citrus juice

Heat the olive oil and garlic in a large pan (I used my wok to be able to hold all the chard) over medium heat. Add the chard, salt, and pepper and cook down for about a minute, tossing constantly. Remove from heat and place a lid over the chard. Let it steam for about 5 minutes to finish. Remove the garlic and spritz with citrus juice.

Serves 2.